Telnet Server for Windows 95/98 V2.2.1 Online Help Introduction to GoodTech Telnet Server How the GoodTech Telnet Server Works Installing GoodTech Telnet Server Configuring the GoodTech Telnet Server Administrating the GoodTech Telnet Server Controlling the GoodTech Telnet Server Working with GoodTech Telnet Server
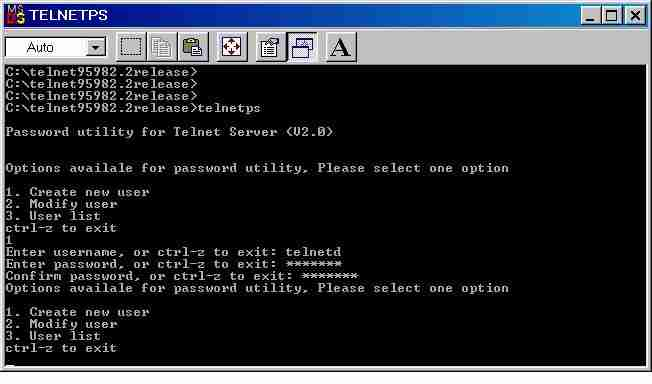
Screen Shots Screen Shot 1-telnetps.exe Password Utility Screen Shot 2-windows 9598 service program, startup parameters Screen Shot 3-setting environment variables Screen Shot 5-telnetd, the log files Screen Shot 6-telnetd, color support Screen shot 8-telnetd, idle login Screen shot 9-switching to line mode This help document gives you an introduction to telnet and to our Telnet Server, describes how to install, set up and use the telnet server, and has a trouble shooting chapter to help you overcome problems. We hope you will find it helpful. Although we did our best to proofread this help, we are unfortunately not immune to mistakes and omissions. If you find any mistake or have suggestions to improve this help, please let us know. Telnet is the standard for character-based network communications. It is a part of TCP/IP, the networking protocol of the Internet. Computer users on local area networks and on the Internet use Telnet to connect to a remote host and execute programs on the host. Telnet server is a server application that runs on a host computer and allows remote users to Telnet in to a host. Telnet client is a client application that allows a user to Telnet out from his system to run a program on remote hosts. Telnet is a useful way for system administrators, programmers and DOS legacy application users to do the following:
To administer a system, you must be at the console of that system. With telnet, the remote administrator can support a system that may be physically located miles away.
Telnet allows moving applications from old platforms to run on 95/98. Telnet is used to provide the interface to the users.
Windows 95/98 can handle multiple users running different jobs at the same time, but only one user can be using the system console at a time. Telnet allows multiple users to be concurrently logged in.
Telnet allows remote users to run programs on the host rather than on their machine. It is more efficient to do so in case the program requires large amounts of resources that reside on the host. Using telnet, a user can run character-based applications only. Telnet does not support graphical programs that use windows. It runs any program that runs in your Windows 95/98 DOS Window. Introduction to GoodTech Telnet Server GoodTech Telnet Server for Windows 95/98 is a telnet server application that runs on a host computer and allows remote users to Telnet in to the host. Microsoft Windows 95/98 networking has a built-in Telnet client, but does not have a built-in Telnet server, so Goodtech Telnet Server can be used to provide the missing build-in Telnet Server functionality. When Goodtech Telnet Server is installed on your Windows 95/98 system, you can Telnet from remote systems and run programs on your Windows 95/98 system. It is a functional, easy to use and high performance tool, that is written based on open standards, can communicate with any standard telnet client and is highly integrated with Windows 95/98 operating system. By using a Telnet client, you can connect to GoodTech Telnet Server from anywhere in the world and login as if you were sitting at the console. Whether you are a system administrator, a programmer or a DOS application user, GoodTech telnet server can provide you with the Telnet Server functionality that you need. How the GoodTech Telnet Server Works The installation program creates a telnet service called telnetd and adds it to the list of services available on your 95/98 system. When the Telnet Server service is started, either manually or automatically, it executes a program named telnetdstart.exe. The program telnetdstart.exe opens a log file telnetd.log in the GoodTech Telnet Server installation directory. telnetdstart.exe is now ready for connection requests. It listens to requests on the default telnet port (#23) or on other port if a different port was specified when the telnet service was started. When a user wants to telnet out to the host running GoodTech telnet server, he runs a telnet client program. The telnet client program sends a connection request to port #23 (or to any other port the telnet server was configured to listen). The telnetdstart.exe program gets the request and opens a thread, which is responsible for this connection with the client. This thread relieves telnetdstart.exe from communicating with the client and let telnetdstart.exe focus on listening to other connection requests. The client thread starts the authentication process. It asks the telnet client for login information. The login information consists of a User ID and a Password. The client thread checks the login information against the password file. If the user passes authentication, he is logged onto the host system. The client thread creates a process that runs a program named telcmd.exe. The telcmd.exe program creates a shell process that by default runs the command.com. The remote user is now ready to work on the host. GoodTech Telnet Server Key Features
Registration is very simple - you are automatically registered when you order from GoodTech Systems. When we receive your order, we will send you back your registration number along with your registered copy of the product. Our simple licensing policy lets you purchase as many copies as you need and get a single license for all copies. Installing GoodTech Telnet Server GoodTech Telnet Server requires Windows 95/98. The TCP/IP protocol must be installed on your Windows 95/98 system. This protocol is included with the Windows 95/98 operating system but is not always installed on all systems. You can check if TCP/IP is installed on your system by choosing Network from the Control Panel. If TCP/IP is installed on your system it should show up in the list of Installed Network Software. Running the Installation Program After downloading the evaluation copy of the GoodTech Telnet Server or receiving the registered copy, you have to perform the following steps:
If you want to install a new version of the Telnet Server but have a previous version currently on your system, you have to do the following:
Run the uninstall program if you want to uninstall the GoodTech Telnet Server from your system, or if you want to start it manually. All you have to do is:
Configuring the GoodTech Telnet Server Creating and Configuring Accounts When a Telnet user logs in to your system via GoodTech Telnet Server, he must be a valid user that was created by the telnet administrator, using the telnet Password utility program, telnetps.exe. The program telnetps.exe creates a password file named telnetd.pas. The passwords are encrypted and can only be changed by using the password utility. The first time you run the pelnetps program, the password file does not exist and you get the following message: "Password file does not exist. Do you want to create a new file?" Answer "y" if you want to go ahead and add user accounts to the Telnet Server. If you answer "n", the file is not created, and no users are allowed to connect to the telnet server. The next step is to create user accounts. You are prompted with the following options: 1. Create new user Select "1" to create a new user. In this case you specify the user name and the user password. 2. Modify user Select "2" to modify an existing user. You'll be prompted for the user's name and password. You have the following options: 1. Disable user Select "1" to prevent a user from connecting to your system. This is the option to choose if you need to delete a user. 2. Change password Select "2" to change user's password. You'll be promped for the new password. 3. Enable user Select "3" to change a disabled user to be a valid user again. 3. User list Select "3" to display a list of all the users that have a telnet account. ctrl-z to exit Press ctrl-z to exit the password utility.
If a user's home directory is specified in the Windows 95/98 system (gt_[username]_home), GoodTech Telnet Server changes to that home directory when the user logs on. (Where username is the name of the user that you wish to set the home directory) If the user home directory is not specified in the Windows 95/98 system , the environemnt variable gt_user_home is used by GoodTech Telnet Server. Please refer to "Setting Environment Variables in Windows 95/98" for information on how to set an environment variable. If no home directory is specified, C:\ is assumed as the home directory. If a user's login script is specified in the Windows 95/98 system, GoodTech Telnet Server executes the login script in the user's home directory when the user logs on. If you want to specify a user login script, you can set the environment
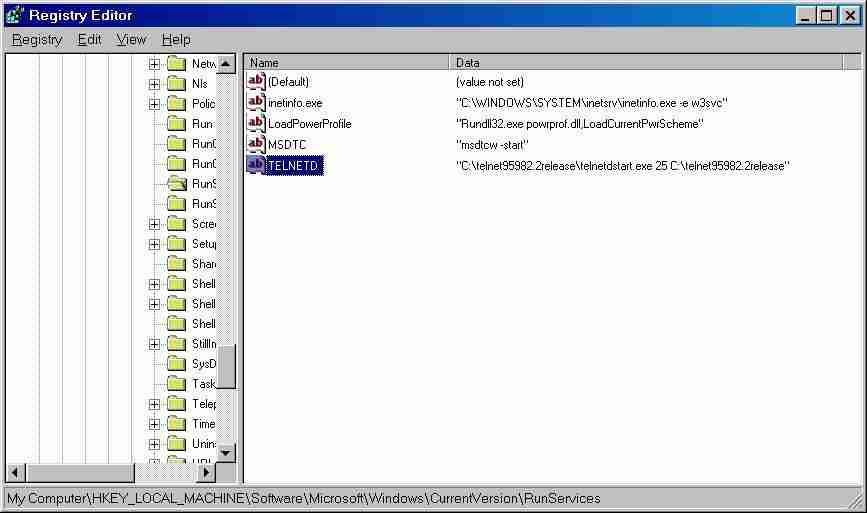
variable gt_[username]_logon_script to point to the user login script. set gt_david_logon_script=c:\scripts\login.bat You can put this line in your autoexec.bat file. Creating the Telnet Administrator Account telnetd telnetd is the telnet administrator account. Administration commands can be performed only from the telnetd account. You have to create an account for the user telnetd (in lower case!), using the password utility. Setting up parameters to GoodTech Telnet Service The default telnet port is port number 23. However, in case port 23 is used by another application, you can set up the GoodTech Telnet Server to use a different port. If you start your Telnet Server manually, you specify the port number as a parameter to the telnetdstart.exe program. You issue the command: telnetdstart [port #] example (use of port 25): telnetdstart 25 If you start your Telnet Server automatically, you have to change the port number in the registry. To update the registry:
The screen shot below is an example of using port 25 when starting the Telnet Server automatically.
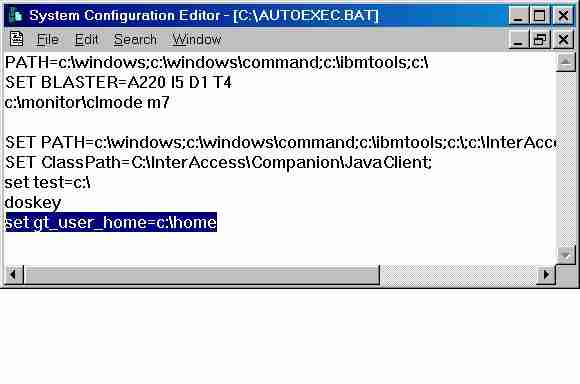
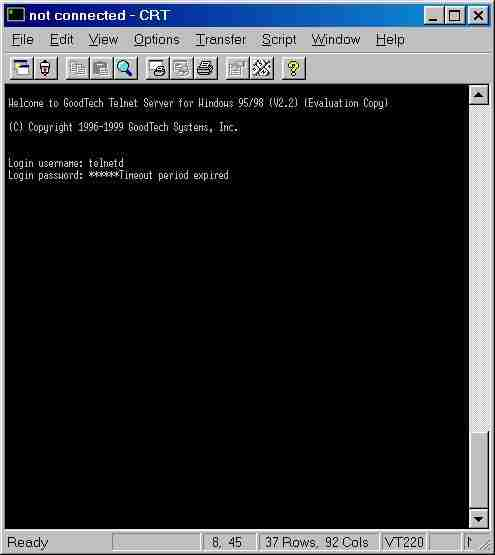
The Telnet client program must be set up to use the same port as the Telnet Server. If you set up the Telnet Server to use a port different than the default (#23), you have to also set up the telnet client to use the same port. Two environment variables are used to control idle sessions: gt_login_idle_time - specifies the time period, in seconds, allowed for the login process before it is automatically disconnected from the host. For example, if you set gt_login_idle_time to 30 seconds and a user doesn't provide login input in the timeout period (30 seconds), the session is closed by the Telnet Server. In case a session is disconnected, the message "Timeout period expired" is displayed on the user's telnet window. If this variable is not defined, or if it has a value of 0, there is no time limit for the login process. gt_session_idle_time specifies the time period, in minutes, allowed for a session to be idle before it is automatically disconnected from the telnet server. In case a session is disconnected, the message "Timeout period expired" is displayed on the users telnet window. If this variable is not defined, or if it has a value of 0, there is no time limit for a session to be idle. It is recommended to set these parameters so that system resources will not be allocated to idle sessions. For instructions on how to set environment variables in Windows 95/98 please refer to the "Setup Environment Variables in Windows 95/98" section. Enabling Alternate Command Shells GoodTech Telnet Server for Windows 95/98 supports other command shells than COMMAND.COM. For example, 4Dos for Windows 95/98 from JP Software is supported. If you want all the telnet users to make use of a command shell other than COMMAND.COM, change your ComSpec environment variable to point to that command interpreter program. For example, if you want to make use of 4DOS, change the ComSpec environment variable to point to 4DOS.EXE program instead of to COMMAND.COM program. For instructions on how to change the Comspec environment variable value please refer to the "Setup Environment Variables in Windows 95/98" section. Setup Environment Variables in Windows 95/98 Run sysedit and select AUTOEXEC.BAT file. Add the environment variable at the end this file. For example, to define gt_user_home, write the following line: set gt_user_home=c:\home (no spaces before or after the "=" sign). You have to reboot your computer after setting up environment variables for the change to take effect. The screenshot below shows how to define the gt_user_home variable and set it to c:\home.
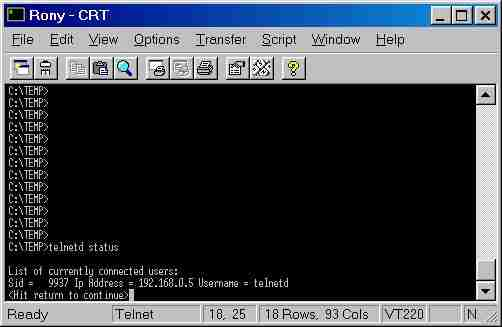
Administrating GoodTech Telnet Server Administration commands can be performed only from the telnetd account. You have to telnet to the host as user telnetd remotely from a client. More than one telnetd user can telnet in to the host at the same time. However, each is count against the maximum number of concurrent connections allowed. You want to make sure that you always keep at least one telnetd user session open, so administration commands will be available even when all concurrent connections are in use. The following commands are currently available: Service Administrating Commands:
Client Administrating Commands:
Controlling the GoodTech Telnet Server Service Starting the GoodTech Telnet Server Service
Stopping the GoodTech Telnet Server Service You have two options:
Pausing the GoodTech Telnet Server Service
Continuing the paused GoodTech Telnet Server Service
Remotely restarting GoodTech Telnet Server Service
Administrative Messages from the Telnet Server
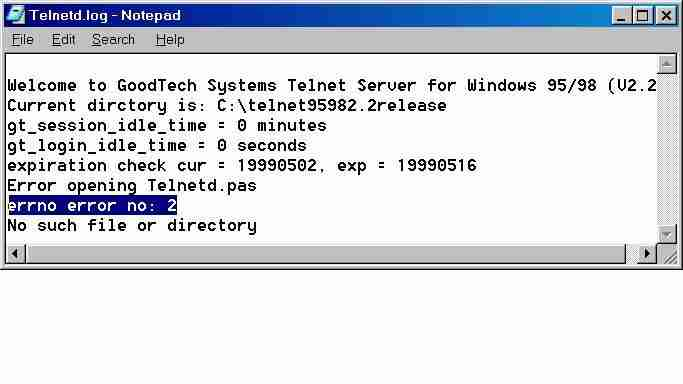
The GoodTech Telnet service uses two Log files, telnetd.log and telcmd.log, to keep a record of everything it does. The log files are kept in the GoodTech Telnet Server installation directory. Here is an example of the telnetd log file content:
For more information on how to monitor your Log file please see the "Monitoring the Log File". Your log files can grow quite large and quite fast, especially if your host is getting a large number of telnet users per day. The size of the files can eat into your disk quota and tie up needed space. To reset your log files, simply delete the files when the telnet server service is not running. Make sure that you don't try to delete your log files when they are actually being written to by the Telnet Server. The next time the telnet server will run, new log files will be created. Working with GoodTech Telnet Server Choosing Your Telnet Client software GoodTech Telent Server is written in open standards and can work with any standard telnet client. There are quite a few telnet clients available, many of which are free. However, CRT from Van Dyke Technologies is our preferred telnet client because it is flexible and friendly and it is less likely to run into problems because GoodTech Telnet Server is thoroughly tested with CRT. The Windows 95,98/NT operating systems are shipped with a telnet client included (found at "c:\windows\telnet.exe" and "c:\winnt\system32\telnet.exe" respectively). This telnet client is simple and functional, but not quite as flexible and friendly as CRT from Van Dyke Technologies, Inc. or POWER TERM from Ericon Software, which have to be purchased. Configuring your Telnet Client The key maps expected by GoodTech Telnet Server are listed below. Check the telnet client for documentation on how to add entries into the keyboard mapping table. The first column is the keyboard key and the second column is the string sequence GoodTech Telnet Server expects to receive for the keyboard key. Double quotes are shown in the escape sequence for easy understanding but are NOT to be sent. Numbers (\xxx) are given in decimal notation. For example, to simulate F1, the Telnet client should send ASCII number 27(not the string 27), followed by O and P (\027 stands for the decimal ASCII 27).
Make sure that the option new line mode is enabled in your telnet client. Otherwise, the carriage return does not work properly when you are in line mode. In MS Telnet Client, this option is the default. In CRT, for example, you have to enable this option under Emulation/Modes. If you want the backspace key to work properly, make sure the backspace key is configured to send backspace and not delete. For example, in the CRT telnet client, you go to the options, session preferences and check the "backspace sends backspace". Make sure that the "backspace sends delete" is unchecked. PC applications use the PC's character set to generate character graphics. Many terminal emulator's graphic character set is different from that of the PC. In order to get all graphic characters properly displayed by GoodTech Telnet Server, use a telnet client that supports character set or font selection. Choose the character set or font that is based on the IBM PC character set. For example, in the CRT telnet client, choose terminal font in its setup menu. Some PC applications make use of colors. In order to get all colors properly displayed by GoodTech Telnet Server, use a telnet client that supports colors. Choose the ANSI color option in the telnet client setup menu.
ESC key To simulate the ESC key, you need to press the Escape key twice. To enable client printing please follow these steps:
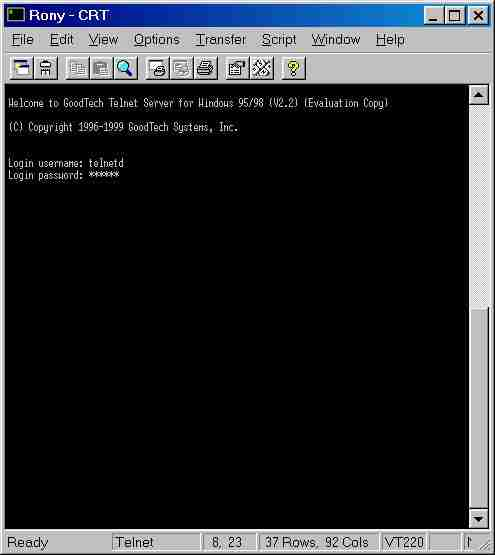
Note: This is done only once! Now, when a user connect to the server machine (via telnet), before printing (copy [file-name] PRN:), the user should run the program gt_capture_printer with his username as a parameter. (e.g. gt_capture_printer david). After the user run this program from the telnet session, he can now print any job to the printer, and the print job will go to the virtual printer (GT_PRINTER) and stays there until the telnet server finds it and send it to the client machine. After the user completes printing, he then need to run the program gt_release_printer with his user name as a parameter. (e.g. gt_release_printer david). When the printer is released, a different user can then capture the printer for himself and print his own files. Enabling an Alternate Command Shell You can make use of a command shell other than the default COMMAND.COM, by running the other shell program from the Telnet session. For example, to use 4DOS from JP software, you can run 4DOS.exe from your telnet session prompt. Working with the Telnet Client Connecting to GoodTech Telnet Server Once you have chosen a Telnet client, connecting to the GoodTech Telnet Server is simple. Although telnet clients vary in their exact configuration, most of them will simply require you to specify a "remote host". Your remote host is the host where the Telnet Server is running. Once you are connected, you will be prompted for your login name and login password. The login name is the name of the user account to log on to. The password specifies the password for the user account.
While the Telnet Server authenticates your login information, the message "Authentication is in progress " is displayed on your screen. If the authentication fails, the message " Login incorrect, please try again authentication failure" is displayed on your screen. After three failure attempts the message " Login incorrect, Closing 3 failure attempts" is displayed on your screen. Your session is disconnected from the host. If you don't fill out the login information within the time period that was specified by the system administrator for login input, your session is disconnected from the host and the message: "Timeout period expired " is displayed on your screen.
After the login process is successful, you will have gained access to the host Server and can now issue commands at the command prompt.
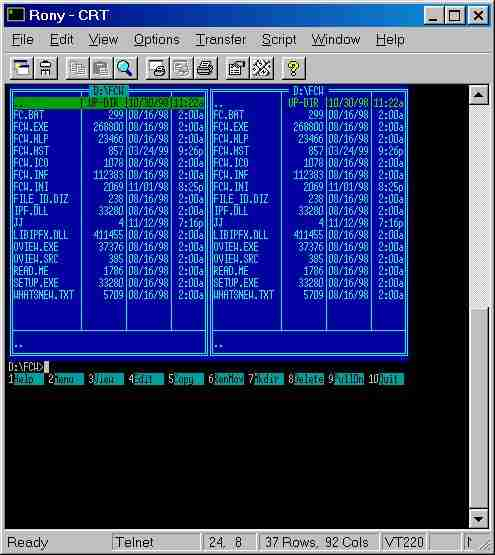
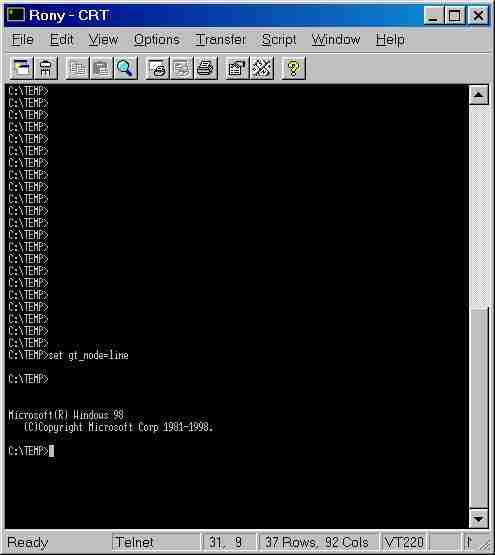
Switching Between Screen Mode and Line Mode In full screen applications, such as MS edit, VI, FCW. Etc., the cursor can be located anywhere on the screen. Screen mode applications are displayed properly only if you are in screen mode. In Line mode, the cursor is always located on the last line of your telnet session window. In this mode you can use the scroll buffer. You can easily switch between modes while in a telnet session. There is no need to re-login any time you change the mode. The default mode is screen mode. If you want to switch to line mode, type the command: set gt_mode=line Please make sure to type the above command in lower case letters and with no extra spaces. This command creates a new DOS session. You are now ready to start working in line mode. The scroll buffer is now available. If the cursor does not move to the next line any time you press the enter key, you need to set up your telnet client to do so. Please refer to Configure the Telnet Client/Line Mode.
If you want to switch back to screen mode, type the command: set gt_mode=screen Please make sure to type the above command in lower case letters and with no extra spaces. This command creates a new DOS session. You are now ready to start working in screen mode. The scroll buffer is not available any more. Windows 95/98 interprets the Alt as a local menu key. As a result, the Alt key is interpreted by Windows 95/98 and is not transferred to the Telnet Client program (or other programs). A replacement key have to be entered at the telnet client in order to have it mapped to the Alt key in the Telnet server. CTRL-A has been re-mapped to act as the Alt key in a telnet session. For example, when working in EDIT.COM, to access the File Menu, instead of pressing ALT-F, press CTRL-A and F to represent ALT-F. Because CTRL-A is used to simulate the ALT key, you need to press CTRL-A twice to simulate CTRL-A. To simulate ALT-A, you need to press CTRL-A and ESC key. To use the number pad keys, disable the NUM-LOCK key. If your session is connected to the Telnet Server, but is idle (no input is sent from the client to the server within the time period that was specified by the system administrator), it is disconnected from the host and the message: "Timeout period expired " is displayed on your screen. Once your telnet connection is established, your Telnet client remains connected to GoodTech Telnet Server until one of the following happens: You request to disconnect by:
The telnet administrator disconnects you by:
Abnormal termination:
Messages from the Telnet Server
You may encounter a problem while using the GoodTech Telnet Server, especially if these are your first steps with the telnet server. The best place to look for answers to questions/problems is this help. You can also try monitoring the log file. If you don't even get to the point that your telnet server is up and running and the log file does not exist yet, try our error messages list. If your error is listed on that list, you'll find the corresponding recommended course of action. And of course, as your last resort, you can always contact our technical support experts. Don't hesitate to contact us, your questions are welcomed. If you contact our technical support, please make sure you provide the following information:
The GoodTech Telnet service uses Log files to keep a record of everything it does. Most of the entries you'll find in the log files are informational or success messages. However, error messages are also written to the log files, and these are what you are looking for, when you are facing a problem. Whenever an error occurs, the telnet server writes the error number into the log file. You can get the error number by searching the string "error no" in your log file. In case this string is found more than once, the first error message is the error you want to solve. In most cases, other errors are a result of the first one. The error messages you encounter as you start using GoodTech Telnet Server are most likely common errors that others encountered as well. Your initial questions are most likely FAQs and you could probably benefit from reading answers to questions that others have asked as well. |
