Telnet Server for Windows NT/2000/XP/2003 Online Help Introduction to GoodTech Telnet Server How the GoodTech Telnet Server Works Installing GoodTech Telnet Server Configuring the GoodTech Telnet Server Creating and Configuring Accounts Administrating the GoodTech Telnet Server Controlling the GoodTech Telnet Server Service Starting the GoodTech Telnet Server Service Stopping the GoodTech Telnet Server Service Pausing the GoodTech Telnet Server Service Working with GoodTech Telnet Server
Screen Shots Screen Shot 1 – Windowns NT Services Program, automatic startup Screen Shot 2 – Windows NT Services Program, Startup Parameters Screen Shot 3 – Windows NT System Properties, Setting Environment Variables Screen Shot 4– Administration from a browser. Login screen Screen Shot 5– Administration from a browser. Options Screen Shot 6– Administration from a browser. Status Screen Shot 7– telnetd, The Command "telnetd status" Screen Shot 8– telnetd, The Log File Screen Shot 9- telnetd, color support Screen Shot 10- telnetd, Login Screen Shot 11- telnetd, Idle Login Screen Shot 12- telnetd, Switching to line mode Screen Shot 13 - telnetd, Window Size Support This help document gives you an introduction to telnet and to our Telnet Server, describes how to install, set up and use the telnet server, and has a trouble shooting chapter to help you overcome problems. We hope you will find it helpful. Although we did our best to proofread this help, we are unfortunately not immune to mistakes and omissions. If you find any mistake or have suggestions to improve this help, please let us know.
Telnet is the standard for character-based network communications. It is a part of TCP/IP, the networking protocol of the Internet. Computer users on local area networks and on the Internet use Telnet to connect to a remote host and execute programs on the host. Telnet server is a server application that runs on a host computer and allows remote users to Telnet in to a host. Telnet client is a client application that allows a user to Telnet out from his system to run a program on remote hosts. Telnet is a useful way for system administrators, programmers and DOS legacy application users to do the following:
To administer a system, you must be at the console of that system. With telnet, the remote administrator can support a system that may be physically located miles away.
Telnet allows moving applications from old platforms to run on NT. Telnet is used to provide the interface to the users.
Windows NT can handle multiple users running different jobs at the same time, but only one user can be using the system console at a time. Telnet allows multiple users to be concurrently logged in.
Telnet allows remote users to run programs on the host rather than on their machine. It is more efficient to do so in case the program requires large amounts of resources that reside on the host. Using telnet, a user can run character-based applications only. Telnet does not support graphical programs that use windows. It runs any program that runs in your Windows NT Command Shell Window.
Introduction to GoodTech Telnet Server GoodTech Telnet Server for Windows NT is a telnet server application that runs on a host computer and allows remote users to Telnet in to the host. Microsoft Windows NT networking has a built-in Telnet client, but does not have a built-in Telnet server, so Goodtech Telnet Server can be used to provide the missing build-in Telnet Server functionality. When Goodtech Telnet Server is installed on your Windows NT system, you can Telnet from remote systems and run programs on your Windows NT system. It is a functional, easy to use and high performance tool, that is written based on open standards, can communicate with any standard telnet client and is highly integrated with Windows NT operating system. By using a Telnet client, you can connect to GoodTech Telnet Server from anywhere in the world and login as if you were sitting at the console. Whether you are a system administrator, a programmer or a DOS application user, GoodTech telnet server can provide you with the Telnet Server functionality that you need.
How the GoodTech Telnet Server Works The installation program creates a telnet service called telnetd and adds it to the list of services available on your NT system. When the Telnet Server service is started, either manually or automatically, it executes a program named telnetd.exe. The program telnetd.exe opens a log file telnetd.log in the %gt_installation_dir% directory.(were gt_installation_dir is a the system environment variable created during installation, that contains the GoodTech Telnet Server installation directory) Telnetd.exe is now ready for connection requests. It listens to requests on the default telnet port (#23) or on other port if a different port was specified when the telnet service was started. When a user wants to telnet out to the host running GoodTech telnet server, he runs a telnet client program. The telnet client program sends a connection request to port #23 (or to any other port the telnet server was configured to listen). The telnetd.exe program gets the request and opens a thread, which is responsible for this connection with the client. This thread relieves telnetd.exe from communicating with the client and let telnetd.exe focus on listening to other connection requests. The client thread starts the authentication process. It asks the telnet client for login information. The login information consists of a User ID, Password and optional Domain. The client thread then uses the internal NT security mechanism to check if the user is allowed to the host. If the user passes authentication, he is logged onto the host system. The client thread creates a process that runs a program named telcmd.exe. The telcmd.exe program creates a shell process that by default runs the cmd.exe. The remote user is now ready to work on the host.
GoodTech Telnet Server Key Features
Registration is very simple - you are automatically registered when you order from GoodTech Systems. When we receive your order, we will send you back your registration number along with your registered copy of the product. Our simple licensing policy lets you purchase as many copies as you need and get a single license for all copies.
Installing GoodTech Telnet Server GoodTech Telnet Server is supported on Windows NT 4.0/2000/XP/2003. The TCP/IP protocol must be installed on your Windows NT system. This protocol is included with the Windows NT operating system but is not always installed on all systems. You can check if TCP/IP is installed on your system by choosing Network from the Control Panel. If TCP/IP is installed on your system it should show up in the list of Installed Network Software. You should use the Administrator account or any other account with administration priveleges to install the GoodTech Telnet Server. Make sure that all users have READ/WRITE/EXECUTE permissions to the Telnet Server installation directory, and READ permission to the SYSTEM32 directory. (e.g. C:WINNT\SYSTEM32). Please note that you can change the permissions to the executable files in the Telnet Server installation directory to READ only.
Running the Installation Program After downloading the evaluation copy of the GoodTech Telnet Server or receiving the registered copy, you have to perform the following steps:
The installation creates a new service with the internal name TELNETD. If a service with a name TELNETD is already in use in your system, you have to uninstall the existing service before you install GoodTech Telnet server. The installation creates a system environment variable called gt_installation_dir that contains the GoodTech Telnet Server installation directory. (Please note that the Telnet Server service starts automatically every time you reboot your machine)
If you want to install a new version of the Telnet Server but have a previous version currently on your system, you have to do the following:
If you want to uninstall the GoodTech Telnet Server from your system, choose one of the following 3 options:
Please note that silent uninstall is also supported by issuing the command: uninst.exe /S from the GoodTech Telnet Server installation directory.
Configuring the GoodTech Telnet Server Creating and Configuring Accounts Using Windows NT User Accounts When a Telnet user logs in to your system via GoodTech Telnet Server, he/she must be a valid user that was created by the Windows NT network administrator, using the Windows NT User Manager or User Manager for Domains. (Or the Active directory for users and computers). GoodTech Telnet Server sets a user’s process to run in the security context appropriate to that user. The user then has exactly the same privileges he would have on the telnet host machine as if he sat down in front of it and logged in on the console.
GoodTech Telnet Server looks for a configuration file named config.dat in the the Telnet Server installation directory. If the file exists it reads the configuration parameters inside it. For example to change the default listening port for Telnet Server (default is 23), you can put the line TELNETD_PORT=33 in this file, and after restarting the Telnet Server service the listening port will be 33. Please that you should restart the Telnet Server service on any modification to the config.dat file. Each parameter in the file should be on a separate line, and have the following syntax: PARAMETER-NAME=PARAMETER-VALUE
If a user’s home directory is specified in the Windows NT account database, GoodTech Telnet Server changes to that home directory when the user logs on. Network drive for a user home directory is supported. If the user home directory is not specified in the Windows NT account database, the system variable gt_user_home is used by GoodTech Telnet Server. Please refer to "Setting System Environment Variables in Windows NT" for information on how to set a system variable. You can also add the line gt_user_home=directory in the config.dat file. If no home directory is specified, the %SystemDrive% is assumed as the home directory.
If a user’s login script is specified in the Windows NT local account database, GoodTech Telnet Server executes the login script in the user’s home directory when the user logs on. GoodTech Telnet Server supports local logon script and domain logon script. If you want to specify a local login script, you can put it in the default scripts
directory: If the login script is located in a subdirectory of the default login directory, precede the filename with that relative path. For example, you might type clerks.bat if the script is located in the default script directory, or you might type \admin\clerks.bat, if the script is located in a subdirectory admin under the default logon path. If you want to specify a domain
login script, you can put it in the default domain scripts directory, on the
domain server machine: You can also define global login script that will be used for ALL users.
If you want to let users login automatically from a specified IP address, you can create a file named auto_login.dat in your Telnet Server instalation directory and create a system environment variable named gt_automatic_login. (You can also add the line gt_automatic_login=yes in the config.dat file.) Each line should have the following format: <IP address> <username> <password> <domain> Where IP address is the connecting machine IP address and the username, password, domain are the authentication parameters. the < and > should not be included. for Example: 192.168.10.1 Linda Lindapassword domain
Creating the Telnet Administrator Account – telnetd telnetd is the telnet administrator account. Administration commands can be performed only from the telnetd account. You have to create an account for the user telnetd (in lower case!), using the Windows NT User Manager or User Manager for Domains. No special permissions are required for this account.
Setting up parameters to GoodTech Telnet Service It is possible to specify an automatic startup for the GoodTech Telnet Server. To do so, you have to perform the following steps:
The default telnet port is port number 23. However, in case port 23 is used by another application, you can set up the GoodTech Telnet Server to use a different port. You can add the line TELNETD_PORT=new-port-number in your config.dat file. You can also set a different port by doing the following: 1. Click on the start button and run the REGEDIT program. This method works for both, automatic and Manual startup of GoodTech Telnet Server. Another way to do this is to specify the port number to be used by the Telnet Server in the Startup parameters input box when starting the Telnet Server service. This method works only if you start and stop the Telnet Server manually. The Telnet client program must be set up to use the same port as the Telnet Server. If you set up the Telnet Server to use a port different than the default (#23), you have to also set up the telnet client to use the same port. The screen shot below is an example of using port 25 when starting the Telnet Server.
Two system environment variables are used to control idle sessions: gt_login_idle_time - specifies the time period, in seconds, allowed for the login process before it is automatically disconnected from the host. (You can also add the line gt_login_idle_time=seconds in the config.dat file.) For example, if you set gt_login_idle_time to 30 seconds and a user doesn’t provide login input in the timeout period (30 seconds), the session is closed by the Telnet Server. In case a session is disconnected, the message "Timeout period expired" is displayed on the user’s telnet window. If this variable is not defined, or if it has a value of 0, there is no time limit for the login process. Gt_session_idle_time – specifies the time period, in minutes, allowed for a session to be idle before it is automatically disconnected from the telnet server. In case a session is disconnected, the message "Timeout period expired" is displayed on the user’s telnet window. (You can also add the line Gt_session_idle_time=minutes in the config.dat file.) If this variable is not defined, or if it has a value of 0, there is no time limit for a session to be idle. It is recommended to set these parameters so that system resources will not be allocated to idle sessions. For instructions on how to set system environment variables in Windows NT please refer to the "Setup System Environment Variables in Windows NT" section.
If you want users to print locally from a Telnet session, you need to configure both the Telnet Server and the Telnet client. The configuration of the Telnet Server side is explained below. Please refer to "Configuring the Telnet Client/Client Printing" for information on how to configure the Telnet Client for client printing. See also "Working with GoodTech Telnet Server/Client Printing" for information on how to set up your telnet session to print locally. You need to Follow the steps below if you want to allow users to print locally on their printers:
Enable Client Printing
The following system environment variable is used to control client printing: gt_print_monitor - controls whether client printing is enabled or disabled. Set this variable to Y to enable client printing. (You can also add the line gt_print_monitor=Y in the config.dat file.) I f this variable is not defined, or if it has a value other than Y, client printing is disabled. Create a Virtual Printer
permissions
Set READ permission for EVERYONE group
on the printers directory at
c:\windows\system32\spool\printers (Right click on the mouse and select
properties/security and add READ permission to the EVERYONE group).
Pause the printer
Enabling Alternate Command Shells GoodTech Telnet Server for Windows NT supports other command shells than CMD.EXE. For example, 4Dos for Windows NT (4NT) from JP Software is supported. If you want all the telnet users to make use of a command shell other than CMD.EXE, change your ComSpec system variable to point to that command interpreter program. For example, if you want to make use of 4NT, change the ComSpec system variable to point to 4NT.EXE program instead of to CMD.EXE program. For instructions on how to change the Comspec variable value please refer to the "Setup System Environment Variables in Windows NT" section. If different users have different preferences regarding what command shell to use, it is possible to make the change at a user lever. A user can change the command shell used from its telnet session. For instructions on how to do that, please refer to Working with GoodTech Telnet Server/Enabling alternate command interpreter.
Connection Restriction based on Host or IP Address You may optionally restrict connections via telnet based upon the host or IP address. Remote access may be limited only to specific hosts or IP addresses. Restrictions based on host or IP are enforced when the file GT_IPF.DAT exists in your installation directory. The first line in this file can be ONE of the keywords, INCLUDE or EXCLUDE. When the first line contains the INCLUDE keyword, then all hosts or IP addresses listed on the following lines are the only hosts/IP addresses that have the permission to access the server machine via telnet. (All other hosts or IP addresses are not allowed). If the first line contains the keyword EXCLUDE, then all hosts/IP addresses listed after this line do not have permission to access the server machine via telnet. (All other hosts or IP addresses are allowed.)
Connection restriction based on number of users You may optionally restrict the maximum number of concurrent telnet users allowed to connect the host machine. The system environment variable that controls this is gt_max_users. (You can also add the line gt_max_users=max-users in the config.dat file.) Valid values: 0 < gt_max_users <= License limit gt_max_users - specifies the maximum number of concurrent users allowed to connect the host machine. For example, if you have a 10 concurrent connections license, and you set gt_max_users to 5, then 5 users at the most can be concurrently connected to the host. For instructions on how to set system environment variables in Windows NT please refer to the "Setup System Environment Variables in Windows NT" section.
Changing GoodTech http port number You may optionally change the default http port number that the telnet server is listening on. The system environment variable that controls this is gt_http_port. (You can also add the line gt_http_port=port-number in the config.dat file.) For instructions on how to set system environment variables in Windows NT please refer to the "Setup System Environment Variables in Windows NT" section.
Disabling domain name in login phase You can disable the domain prompt during login phase, by setting the system environment variable gt_domain_disable to 'yes'. (You can also add the line gt_domain_disable=yes in the config.dat file.) For instructions on how to set system environment variables in Windows NT please refer to the "Setup System Environment Variables in Windows NT" section.
You can create a default domain name to be used in the authentication phase. This option is valid only when the domain name is disabled by creating a system environment variable named gt_default_domain and setting the value to your domain name. The domain name will be used for the supplied user and password you enter during the login phase. (You can also add the line gt_default_domain=default-domain-name in the config.dat file.)
Disable the termination of job processes By default any process that was created during the Telnet session is terminated upon user logout. If you want to disable this option you can create a system environment variable named gt_disable_job and set the value to 'yes'. This parameter is only valid for Win2K and above. You can also add the line gt_disable_job=yes in the config.dat file.
You can define global login script for ALL users using the Telnet Server. The file will be executed as part of the login process of each user connecting through the Telnet Server. You should create environment variable named gt_login_file and set the value to the full path of your login file. (Including the file prefix).
By default the bell character (ASCII 0x7) is heard on the Server machine when using Telnet protocol. In order to hear the bell sound on the Telnet Client, you should create a system environment variable named gt_bell_char and set the value to ASCII decimal 134 (which is a lowercase a with a circle over it). Any application running on the server that writes the ASCII value 134 to the screen will enable the bell sound on the client side. This option in only valid when using screen mode. You can also add the line gt_bell_char=ASCII-VALUE in the config.dat file.
By default ASCII characters under decimal 32 will be replaced by the space character (ASCII 32). In order to see ALL characters including the ones under ASCII 32, you should create a system environment variable named gt_show_all_chars and set the value to 'yes'. You can also add the line gt_show_all_chars=yes in the config.dat file.
Changing the default window size By default the Window size is set according to the size of the Telnet client. In case you want to change the default behavior you should create a system environment variable named gt_window_size and set the value to rows,cols. For example to set the default window size to be 10 rows and 40 columns the value for this system variable should be 10,40. You can also add the line gt_window_size=rows,cols in the config.dat file.
Setup System Environment Variables in Windows NT Go to the control panel, system, environment, select the system variable scrolling list, then enter the parameter (e.g. gt_login_idle_time) in the variable text box and the value in the value box. Press the Set button and then the OK button. You have to reboot your computer after defining system environment variables for the change to take effect. The screenshot below shows as an example how to define the gt_login_idle_time variable and set its value to 30 seconds.
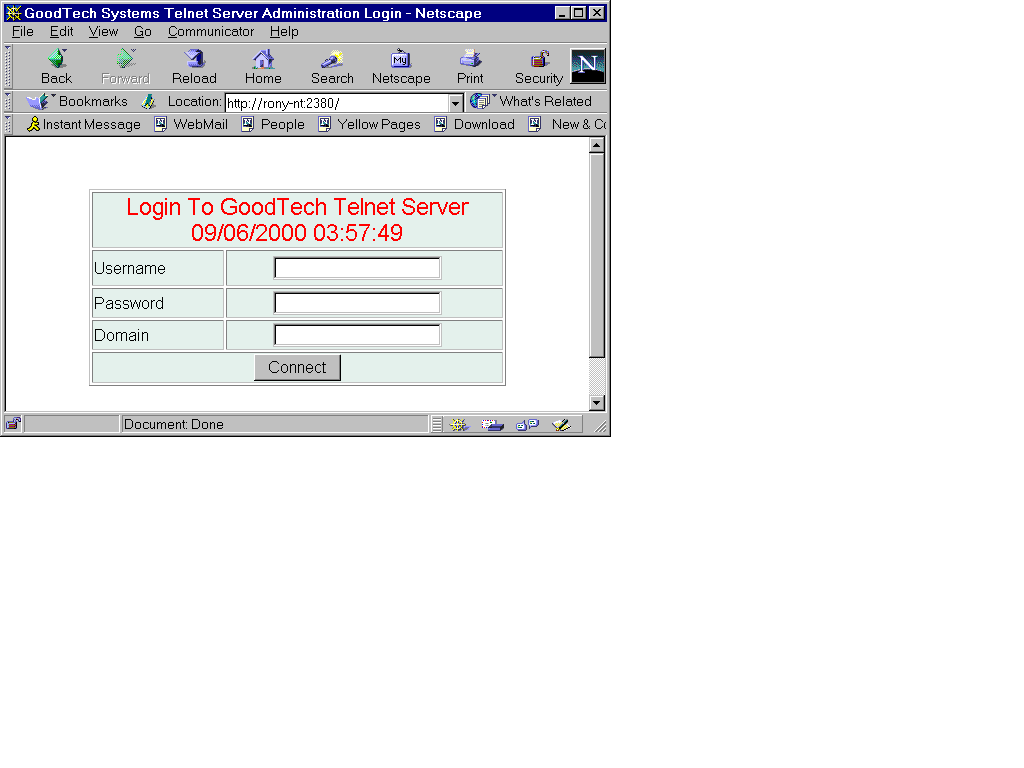
You can customized the welcome message that appears during login phase by creating a file named gt_welcome_message.dat in your telnet server installation directory. You can put your personal welcome message in this file and it will be displayed during the login phase. Administrating GoodTech Telnet Server Login page Administration commands can be performed via a web browser. This feature gives you a Graphic interface to administrate the Telnet Server product. You can always use the command line interface to get the same results. In order to use this option, you should open a web browser with the following URL: http://name or IP address of machine that runs Telnet Server:2380 For example: you can write http://my-machine:2380 or you can write http://192.168.0.1:2380 You should always use port number 2380 in your URL unless you change the default. If the Telnet Server is up you get a login page. You can login as a 'telnetd' user or any other user that belongs to the administrators group. This is the only accounts with Telnet Server administrative privileges. The screenshot below shows the login screen from a Netscape browser.
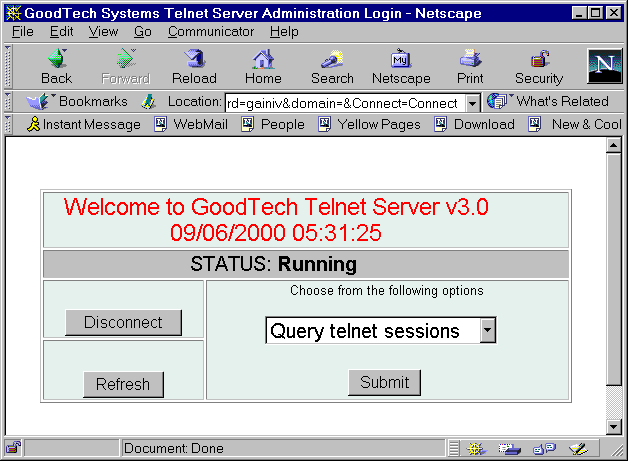
Administration options This page offers the following options:
Press the Submit button to execute the option of your choice. The Disconnect button disconnects you from the server. The Refresh button refreshes the telnet server status on the status line. The screenshot below shows the administration options from a Netscape browser.
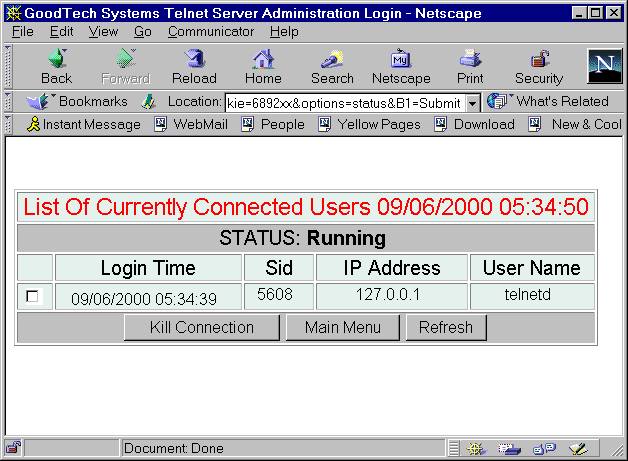
Status page For each open session to the telnet server the following information is displayed: Login time - client login time Sid - system identifier of the client session IP address - client IP address User name - client user name Kill Connection button - kills all checked client sessions. Main Menu button - takes you back to the options page. Refresh button - refreshes the telnet server status on the status line. The screenshot below shows the status option from a Netscape browser.
Administration commands can be performed only from the 'telnetd' account. You have to telnet to the host as user telnetd, either locally, from the host itself, or remotely, from a client. More than one telnetd user can telnet out to the host at the same time. However, each is count against the maximum number of concurrent connections allowed. You want to make sure that you always keep at least one telnetd user session open, so administration commands will be available even when all concurrent connections are in use. The following commands are currently available: Service Administrating Commands:
Clients Administrating Commands:
Controlling the GoodTech Telnet Server Service Starting the GoodTech Telnet Server Service You have a few options:
Stopping the GoodTech Telnet Server Service You have a few options:
Pausing the GoodTech Telnet Server Service You have a few options:
Continuing the paused GoodTech Telnet Server Service You have a few options:
Remotely restarting GoodTech Telnet Server Service
Administrative Messages from the Telnet Server
The GoodTech Telnet service uses two Log files, telnetd.log and telcmd.log, to keep a record of everything it does. The log files are kept in the GoodTech Telnet Server installation directory. Here is an example of the telnetd log file content:
For more information on how to monitor your Log file please see the "Monitoring the Log File".
Your log files can grow quite large and quite fast, especially if your host is getting a large number of telnet users per day. The size of the files can eat into your disk quota and tie up needed space. To reset your log files, simply delete the files when the telnet server service is not running. Make sure that you don’t try to delete your log files when they are actually being written to by the Telnet Server. The next time the telnet server will run, new log files will be created.
Working with GoodTech Telnet Server Choosing Your Telnet Client software GoodTech Telent Server is written in open standards and can work with any standard telnet client. There are quite a few telnet clients available, many of which are free. H However, GTTerm from GoodTech Systems is our preferred telnet client because it is flexible and friendly and it is less likely to run into problems because GoodTech Telnet Server is thoroughly tested with GTTerm. The Windows 95,98/NT operating systems are shipped with a telnet client included (found at "c:\windows\telnet.exe" and "c:\winnt\system32\telnet.exe" respectively). This telnet client is simple and functional, but not quite as flexible and friendly as GTTerm from GoodTech Systems. from Ericon Software, which have to be purchased.
Configuring your Telnet Client The key maps expected by GoodTech Telnet Server are listed below. Check the telnet client for documentation on how to add entries into the keyboard mapping table. The first column is the keyboard key and the second column is the string sequence GoodTech Telnet Server expects to receive for the keyboard key. Double quotes are shown in the escape sequence for easy understanding but are NOT to be sent. Numbers (\xxx) are given in decimal notation. For example, to simulate F1, the Telnet client should send ASCII number 27(not the string 27), followed by O and P (\027 stands for the decimal ASCII 27).
Make sure that the option new line mode is enabled in your telnet client. Otherwise, the carriage return does not work properly when you are in line mode. In GTTerm and MS Telnet Client, this option is the default. In CRT, for example, you have to enable this option under Emulation/Modes.
If you want the backspace key to work properly, make sure the backspace key is configured to send backspace and not delete. For example, in the CRT telnet client, you go to the options, session preferences and check the "backspace sends backspace". Make sure that the "backspace sends delete" is unchecked.
PC applications use the PC’s character set to generate character graphics. Many terminal emulators’ graphic character set is different from that of the PC. In order to get all graphic characters properly displayed by GoodTech Telnet Server, use a telnet client that supports character set or font selection. Choose the character set or font that is based on the IBM PC character set. For example, in the CRT telnet client, choose terminal font in its setup menu. Some PC applications make use of colors. In order to get all colors properly displayed by GoodTech Telnet Server, use a telnet client that supports colors. Choose the ANSI color option in the telnet client setup menu.
ESC key To simulate the ESC key, you need to press the Escape key twice. Follow the steps below if you want to print locally from your telnet session:
Enabling an Alternate Command Shell You can make use of a command shell other than the default CMD.EXE, by running the other shell program from the Telnet session. For example, to use 4NT from JP software, you can run 4NT.exe from your telnet session prompt.
Working with the Telnet Client Connecting to GoodTech Telnet Server Once you have chosen a Telnet client, connecting to the GoodTech Telnet Server is simple. Although telnet clients vary in their exact configuration, most of them will simply require you to specify a "remote host". Your remote host is the host where the Telnet Server is running. Once you are connected, you will be prompted for your login name, login password and domain. The login name is the name of the user account to log on to. The password specifies the password for the user account. The domain specifies the name of the domain whose account database contains the user name account. For remote authentication you provide the remote domain name. For local authentication on the server where the GoodTech Telnet Server is running, leave it blank. In this case, the local account database is searched.
While the Telnet Server authenticates your login information, the message "Authentication is in progress…" is displayed on your screen. If the authentication fails, the message " Login incorrect, please try again authentication failure" is displayed on your screen. After three failure attempts the message " Login incorrect, Closing 3 failure attempts" is displayed on your screen. Your session is disconnected from the host. If you don't fill out the login information within the time period that was specified by the system administrator for login input, your session is disconnected from the host and the message: "Timeout period expired " is displayed on your screen.
After the login process is successful, you will have gained access to the host Server and can now issue commands at the command prompt.
Switching Between Screen Mode and Line Mode In full screen applications, such as MS edit, VI, FCW. Etc., the cursor can be located anywhere on the screen. Screen mode applications are displayed properly only if you are in screen mode. In Line mode, the cursor is always located on the last line of your telnet session window. In this mode you can use the scroll buffer. You can easily switch between modes while in a telnet session. There is no need to re-login any time you change the mode. The default mode is screen mode. If you want to switch to line mode, type the command: set gt_mode=line Please make sure to type the above command in lower case letters and with no extra spaces. This command creates a new DOS session. You are now ready to start working in line mode. The scroll buffer is now available. If the cursor does not move to the next line any time you press the enter key, you need to set up your telnet client to do so. Please refer to Configure the Telnet Client/Line Mode.
If you want to switch back to screen mode, type the command: set gt_mode=screen Please make sure to type the above command in lower case letters and with no extra spaces. This command creates a new DOS session. You are now ready to start working in screen mode. The scroll buffer is not available any more. In addition you can also create a file named gt_ip_mode.dat in your Telnet Server installation directory that contains the default mode for a specific IP address. (line or screen). For example the following line sets the default mode to be line mode for IP 192.168.10.1: 192.168.10.1 line You can also sets the default mode for a specific user. You can create a file named gt_user_mode.dat in your Telnet Server installation directory and create a line that contains the user with the default mode. (line or screen). For example the following line sets the default mode for user Sam to be screen mode: sam screen Each of the above files can contain more than one line. Adding the line GT_MODE=LINE or GT_MODE=SCREEN to config.dat file sets the default mode to LINE or SCREEN mode for ALL users.
Some old applications, such as EDIT.com or debug.exe, are best displayed if the window size is set to 25 lines * 80 columns. However, if the application supports a window size other than 25*80 (i.e. FCW.exe), It is possible to resize the window while connecting to the GoodTech Telnet Server. If the telnet client communicates the telnet terminal window size, GoodTech Telnet Server supports the communicated window size. If the window size is not communicated by the telnet client, then a default of 25*80 should be used. The screenshot below is an example for a Telnet Client window size of 15*70 connected to GoodTech Telnet Server.
Windows NT interprets the Alt as a local menu key. As a result, the Alt key is interpreted by Windows NT and is not transferred to the Telnet Client program (or other programs). A replacement key have to be entered at the telnet client in order to have it mapped to the Alt key in the Telnet server. CTRL-A has been re-mapped to act as the Alt key in a telnet session. For example, when working in EDIT.COM, to access the File Menu, instead of pressing ALT-F, press CTRL-A and F to represent ALT-F. Because CTRL-A is used to simulate the ALT key, you need to press CTRL-A twice to simulate CTRL-A. To simulate ALT-A, you need to press CTRL-A and ESC key.
To use the number pad keys, make sure that NUM-LOCK is disabled. If you want to print locally from your Telnet session, you need to issue the following command from the telnet session any time you telnet to the server: NET USE lptn: \\ServerName\gt_printer lptn: lpt1, lpt2 or lpt3 depending on what port you are printing to. lpt1 is the default port for printing. ServeName: The remote host you are connected to. Example: NET USE lpt1: \\YourHostName\gt_printer This command redirects printing from the server printing port to the virtual printer, so GoodTech Telnet Server can read from the virtual printer and send the printing to the client for print out. If your session is connected to the Telnet Server, but is idle (no input is sent from the client to the server within the time period that was specified by the system administrator), it is disconnected from the host and the message: "Timeout period expired " is displayed on your screen. Once your telnet connection is established, your Telnet client remains connected to GoodTech Telnet Server until one of the following happens: You request to disconnect by:
The telnet administrator disconnects you by:
Abnormal termination:
Messages from the Telnet Server
It is not uncommon to encounter a problem while using the GoodTech Telnet Server, especially if these are your first steps with the telnet server. The best place to look for answers to questions/problems is this help. You can also try the frequently asked questions list. If your question/problem was not answered/solved, you can try monitoring the log file. If you don't even get to the point that your telnet server is up and running and the log file does not exist yet, try our error messages list. If your error is listed on that list, you'll find the corresponding recommended course of action. And of course, as your last resort, you can always contact our technical support experts. Don't hesitate to contact us, your questions are welcomed. If you contact our technical support, please make sure you provide the following information:
The GoodTech Telnet service uses Log files to keep a record of everything it does. Most of the entries you'll find in the log files are informational or success messages. However, error messages are also written to the log files, and these are what you are looking for, when you are facing a problem. Whenever an error occurs, the telnet server writes the error number into the log file. You can get the error number by searching the string "error no" in your log file. In case this string is found more than once, the first error message is the error you want to solve. In most cases, other errors are a result of the first one. In the log file you will find only the error number, but you can easily translate the error number to its description by doing the following: Go to a Command Shell Prompt and type "NET HELPMSG [error number]" If the error description is too vague and you are not sure what should you do to overcome the problem, try to check out the error in our list of common errors for a recommended course of action.
The error messages you encounter as you start using GoodTech Telnet Server are most likely common errors that others encountered as well. Your initial questions are most likely FAQs and you could probably benefit from reading the questions others have asked as well.
|