User’s Guide to GoodTech GTTerm
Introduction
Welcome
This help documents GTTerm V5.0.
If you do not find the information you need here,
please e-mail any questions you have to support@goodtechsys.com
GTTerm is a trademark of GoodTech Systems, Inc.
Features
§
Easy
installation
§
User
preferences
§
Telnet
protocol support, including to a specific port
§
Rlogin
protocol support, including to a specific port
§
SSH protocol
support, SSH2 only.
§
Easy
reconnect on connect abort and close
§
Client
printing support
§
Can open
unlimited windows for multiple connections
§
Scrollback
buffer
§
Supports VT
(100 to 400) and Ansi emulation
§
User-defined
foreground and background colours
§
Configurable
number of rows and columns
§
Ability to
select separate fonts
§
ANSI color
§
Different
cursor styles and support for customizing cursor color
§
Support
fordifferent characters sets
§
VT keyboard
emulation
§
Copy and
paste support
Telnet with GTTerm
1.
Click on
File, Connect, Telnet
2.
Type the host
(server) name or IP address into the "Hostname or IP" field
3.
Change the
port if it's different than the default (23)
Rlogin with GTTerm
1.
Click on
File, Connect, Rlogin
2.
Type the host
(server) name or IP address into the "Hostname or IP" field
3.
Change the
port if it's different than the default (513)
SSH with GTTerm
1.
Click on
File, Connect, SSH
2.
Type the host
(server) name or IP address into the “Hostname or IP” field
3.
Change the
port if it’s different than the default (22)
4.
Type the
username/password in the Username/Password fields
File Menu
Connect, New window
Open another GTTerm Window.
Connect, Telnet
Displays the Telnet Connect dialog.
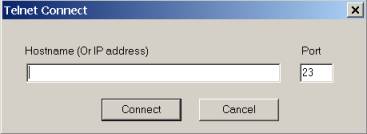
In the Hostname field put the name or IP address of
the host you wish to connect to.
The default port for Telnet session is 23. You can change this number if your Telnet Server is listening on a different port number.
Connect, Rlogin
Displays the Rlogin Connect dialog.

In the Hostname field put the name or IP address of
the host you wish to connect to.
In the Username field put the name of the user that
you want to use in order to authenticate your self.
The default port for Rlogin session is 513. You can
change this number if your Rlogin Server is listening on a different port
number.
Rlogin client uses local port between 900 to 1023. In
some cases when the Rlogin session is aborted abnormally, you might get an
error message that the “Addess is already in use”. In this case you can change
the local port field, and use a different number.
Connect, SSH
Displays the SSH Connect dialog.
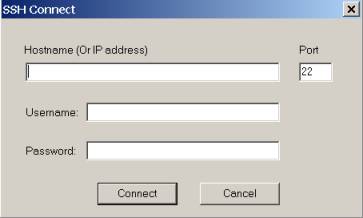
In the Hostname field put the name or IP address of
the host you wish to connect to.
In the Username/Password fields put the name of the
user and password that you want to use in order to authenticate your self.
The default port for SSH session is 22. You can change this number if your SSH Server is listening on a different port number.
Disconnect
Disconnects a connected session. This option is only available when you are connected.
Exit
Closes the current window.
Edit Menu
Clear Scrollback
Clears the terminal’s scrollback buffer.
Reset terminal
Causes a full reset of the terminal emulation. You can use this option when printed characters become unreadable. This option is only available when you are connected.
Full Screen
Switch between Full screen and default screen size
Tools Menu
Settings, Terminal
Opens the Terminal
settings dialog.
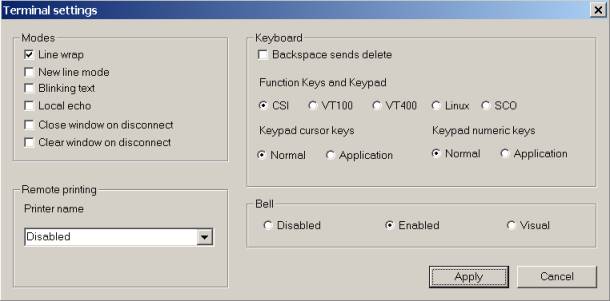
Modes:
Line wrap – If “line wrap is selected”, lines longer
than the current display are wrapped to the next line.
Line warap is
selected by default.
New line mode – If “New line mode” is selected, pressing
the Enter key sends both CR and LF. By default this option is turned off.
Blinking text – If “Blinking text” is selected, blinking
text will be diaplyed. By default this option is turned off.
Local echo – If “Local echo” is selected, user input
is echoed to the screen. By default this option is disabled.
Close window on
disconnect – If “Close
window on disconnect” is selected, disconnecting the session will also close
the current window. By default this option is disabled.
Clear window on
disconnect – If “Clear
window on disconnect” is selected, disconnecting the session will also clear
the current display and keep the current window open. By default this option is
disabled.
Keyboard:
Backspace sends
delete – If “Backspace
sends delete” is selected, the delete character is sent when pressing on the
backspace key. By default this option is disabled.
Function keys
and keypad - This option
affects the function keys (F1 to F12) and the top row of the numeric
keypad. The default mode is CSI. CSI uses the general behaviour of DEC
terminals.
In VT100
mode, the function keys generate ESC OP through to ESC O[
In VT400
mode, all the function keys behave like the default mode, but the actual top
row of the numeric keypad generates ESC OP through to ESC OS.
In Linux
mode, F6 to F12 behave just like the default mode, but F1 to F5 generate ESC
[[A through to ESC [[E.
In SCO
mode, the function keys F1 to F12 generate ESC [M through to ESC [X. Together
with shift, they generate ESC [Y through to ESC [j. With control they generate
ESC [k through to ESC [v, and with shift and control together they generate ESC
[w through to ESC [{.
Keypad
cursor keys:
In Normal
mode (Default mode), the arrow keys send ESC [A through to ESC [D.
In Application
mode, the arrow keys send ESC OA through to ESC OD.
Keypad
numeric keys:
In Normal
mode, the keypad behaves like a normal Windows keypad: with NumLock on, the
number keys generate numbers, and with NumLock off they act like the arrow
keys.
In Application
mode, all the keypad keys send control sequences.
Remote
printing:
This option is disabled by default. If you wish to print a file from your remote session locally on your one of your printers, select the printer name from the list of printers.
Bell:
This option lets you change the way bell behaviour. By default bell is enabled. If visial bell is selected, the screen is momentarily switched to reverse video. You can also disable bell completely.
To get
changes you made in effect, click on the Apply button.
To cancel changes you made, click on the Cancel button.
Settings, Window
Opens the Window
settings dialog
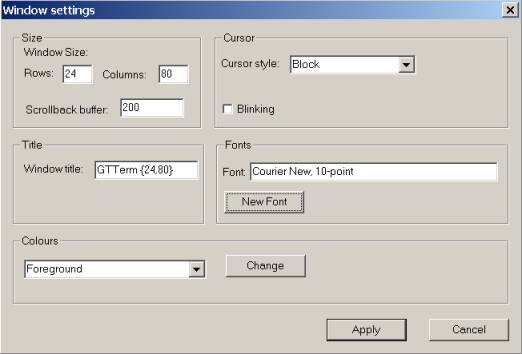
Size:
Window Size – Displays the current window size. You
can also change the size of the window by changing the Rows and Columns. By
using the mouse you can also change window size.
Scrollback
buffer – Changes the size
of the scrollback buffer. The default size is 200 lines.
Cursor:
Cursor style – Choose between Block, Unerline and
Vertical bar. Defualt to Block cursor.
Blinking – Selecting this option will cause the
cursor to blink.
Title:
Window title – Sets the current Window title
Fonts:
Displays the current font selected for the session.
You can change the font by clicking on the “New Font” button.
For Windows emulation, it is recommended to useTerminal font.
Colours:
Changes default colours for forground, background, bold
forground, bold background, cursor and cursor text. To
change colours click on the “Change” button.
Character translation:
You can select from different character sets in order to display
special characters correctly.
For Windows session, it is recommended to use “Font encoding”.
To get
changes you made in effect, click on the Apply button.
To cancel changes you made, click on the Cancel button.
Load settings
Open the load settings dialog.
Loads saved settings for the current session.
Save settings
Opens the Save
settings dialog.
If you want to save your current settings for future use, use this dialog and save your current settings to a file.
Help Menu
Help topics
Opens the Help
dialog
About GTTerm
Opens the About
dialog.
Displays the
current GTTerm version.